Burlap & Blooms DIY Wreath


I finally had a chance to put together another Burlap & Blooms Wreath kit.  It was so easy and it looks fabulous.  It took about 1 hour and 15 minutes.  I would estimate it would take around 2 -3 hours for a group to complete this project as I was racing against the clock to finish and had I slowed down, chatted, eaten some chocolate and enjoyed fellow crafters company, it would have easily taken longer.

If you haven’t already signed up, head over to EventBrite and sign up to make this wreath NOW before they sell out.  I have already preordered half of the wreaths and if you sign up this week, there will be time for yours as well.

Burlap & Bloom Wreath and Card Class

Class Fee: $28

Scheduled for:

Saturday, March 22, 2014

1:00PM

April’s Stampin’ Studio

Toano, Virginia 23168

In addition to making this adorable Wreath, you will also receive a silicone crafting mat, which is awesome for working with hot glue.  The glue just peels right off after it dries. We will also make a mini matching card with a floral wreath on the front.  You do not want to miss out on this crafting date, so grab your friend, daughter or neighbor and sign up for this girl’s day in for DIY wreath making.

11-IMG_2194

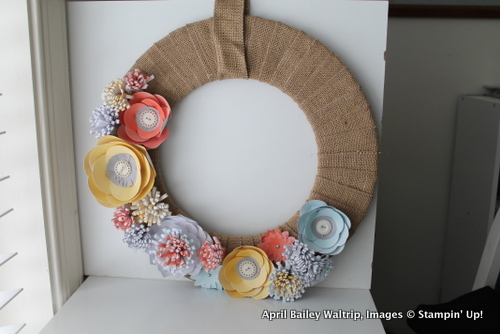
Here is a close up of the flower detail.  I love the subtle watercolors with the pop of Calypso Coral.10-IMG_2193  09-IMG_2192

And remember, it’s Sale-A-Bration, so every $50, gets you a free gift.

MainAd_SAB_OLO_Jan2814_US

Easy Designer Paper Wreath Tutorial

Good Morning and happy crafting!  Today’s project is this adorable wreath. I am working on party decorations for Silas’ first birthday and this was the perfect addition to my front door.

It is so easy to make and takes no time at all.

Stampin’ Up Supplies:

  • Designer Series Paper of your choice (I used World Spectacular) (126897)
  • Tom Bow multipurpose glue (110755)
  • Stampin’ Trimmer (126889)
  • Paper Snips (103579)
  • Foam Wreath

Directions:

  1. Use Stampin’ Trimmer to cut Designer Series Paper into 2″x 12″ strips.  Flag both ends of each strip with Paper Snips.
  2. Loop first strip around wreath form and apply TomBow adhesive to the flagged portion and a bit above on the strip that is under the wreath, but facing upward.  Line up the portion of the strip that lies over the wreath and press together to adhere.
  3. Continue until wreath is covered.  This took approximately 20 strips to cover the wreath (4 sheets of designer series paper).
  4. To ensure that the strips stay in place, place a small line of adhesive under the spots where the strips overlap and adhere the strips to one another. This will keep them from moving around and exposing the wreath base.
  5. Ta-Done!

1450795_10100134759028939_158347237_n image

Wonderful Wreath Card

Another Christmas card for this year’s stamp-a-stack.  This card is easy to make and duplicate in multiples.

20131009-135635.jpg

Stampin’ Up! supplies:

  • Wonderful Wreath stamp
  • Whisper White card stock
  • Cherry Cobbler card stock
  • Season of Style Designer Series Paper Stack
  • Cherry Cobbler 1″ ribbon
  • Old Olive ink
  • Dazzling Details – Cherry Cobbler
  • Dimensionals
  • Paper Snips

Stamping tips:

  • Stamp the Wreath in Old Olive ink. Cut out the center and around the edges.  Add Dazzling Details glitter glue to look like berries.
  • Tie the ribbon around all card layers except the base.

Happy crafting!!