Cute 12×12 Treat Bag

Adorable 12″ x 12″ Birthday Treat Bag Tutorial

Image


Stampin’ Up! Supplies:

  • Birthday Basic DSP
  • Basic Gray card stock
  • Crisp Cantaloupe Ruffle Trim
  • Bermuda Bay 1/8″ Ribbon
  • Stampin Trimmer
  • 1/8″ Hole Punch
  • Sticky Strip

As I was perusing Pinterest this morning, I ran across the cutest bag tutorial from Pootles Papercrafts, another Stampin’ Up! demonstrator.  I am trying to use up my enormous stash of designer series paper and this is the perfect way to do it.  In addition,  the DSP is retiring on the first of June and you don’t want to miss out.

Let me tell you a little secret. Tomorrow there is going to be a HUGE CLEARANCE BLOWOUT.  And everything is going to sell out.  At like 12:00AM. So, with that said, order TODAY or at midnight tonight, because when items hit the clearance rack, they rarely last more than a few hours!

I am going to refer you to the video because it makes putting it together easier for you and will make more sense. However, I have listed the measurements and directions below so that you can look back for reference and go along with the video.

Here is the link to the tutorial: https://www.youtube.com/watch?v=gUK4pUULkas

Directions:

Use DSP Paper that measures 12×12″

Score at 2 1/4, 5 3/4, 8, 11 1/2″.

Score on the opposite side at 2 1/4 and  9 1/4″.

Cut all bottom slits (smaller scored side).  Cut out the smallest sliver. For the top, which is the larger of the scored panels, cut off all but the second panel from the right, including the sliver (So that makes it the first LARGE panel on the right hand side- leave that one in tact).

Happy Crafting!


Craft Fair Friday, Part 9: Flower Bookmarks

Craft Fair Friday, Part 9!

Flower Bookmark Tutorial

For today’s craft show & vendor fair tutorial, we will be making Stampin’ Up! Flower Bookmarks.

IMG_1356

Supplies:

  • Designer Series Paper
  • 3/8″ In Color Ribbon
  • Primrose Petals Stamp Pad
  • Blossom Punch
  • 1″ circle Punch
  • Stampin’ Sponge
  • Brights or Subtles Buttons
  • Stampin’ Dimensionals
  • Hot glue Gun

IMG_1338

Directions:

1. Punch out 3 blossom punches of DSP. Punch out 3- 1″ circle punches of DSP or coordinating card stock. Sponge the edges of the blossom punches with Primrose Petals ink.

TIP: Sponging will add dimension to the flowers.

IMG_1341

2.  Add a Dimensional to the back of the first flower. Make sure it is centered well.  Peel off the paper backing.

This will be the front of the finished flower.  You will be working from the front towards the back as you add layers (the last layer you add will be the bottom flower of the finished bookmark).

IMG_1342

3.  Add a 1″ circle to the Flower and add another dimensional to the 1″ circle back.

IMG_1343

4. Add another Flower to the Dimensional.  You will want to offset the flower petals so they fill in the open spaces.  Add a dimensional on the back of the flower, again making sure that all dimensionals are centered. IMG_1344

5.  Again, add a 1″ circle punch to the flower and add another dimensional.

IMG_1345

6.  Add your final flower.  Add a dot of hot glue to the back of this flower (which will be the back of the bookmark although it was the last flower added).

IMG_1348

7.  Add your ribbon to the hot glue.

IMG_1349

8.  Add another drop of hot glue and add a 1″ circle to cover the back.

IMG_1350

IMG_1352

[Finished back of flower bookmark]

9.  Flip over the flower bookmark to add a button. Add a drop of hot glue to the front of the flowers and adhere a button in the center.

IMG_1353

IMG_1354

Finished!

IMG_1357

IMG_1358

IMG_1356

Aren’t they great!  I love these flower bookmarks.  They make a great gift for the person who has everything. And nothing beats a handmade gift.  Enjoy making your flower bookmarks.

Lastly, if you missed the previous Craft Fair Friday posts, you can see them here:

Craft Fair Friday, Part 8: Color Your Own Bookmark

Craft Fair Friday, Part 7: Set Up & Display

Craft Fair Friday, Part 6: Pebble Magnet Tutorial

Craft Fair Friday, Part 5: Fancy Flower Journals Tutorial

Craft Fair Friday, Part 4: Post-it Note Frame Holders Tutorial

Craft Fair Friday, Part 3: 3×3 Card Boxes

Craft Show Display Pictures

Craft Fair Friday, Part 2: Tiny Tags Tutorial

Craft Fair Friday, Part 1: Hand Sanitizer Purse Tutorial

Craft Fair Friday, Part 8

It’s FRIDAY, Craft Fair Friday.  PART 8!  Wow, we have learned a lot so far.

Today’s craft show talk includes My Digital Studio, which can now be purchased for only $19.95. It’s a GREAT value and here is the perfect way to make your money back on it.  According to the MDS printing policy, you can sell 150 prints without sending them to the professional print service. That means you can print 150 items at home and sell them.  You can print unlimited for personal use. But, you won’t be disappointed by the professional print service!

These Color Your Own Bookmarks were a hit.  I had a ton of buyers and they were fairly simple to make.

You will need:

  • My Digital Studio
  • C is for Coloring Digital Download
  • On the Go Designer Serier Paper- Digital
  • Whisper White Card Stock

Screen shot 2013-04-09 at 11.59.33 PM


Here is the template I used.

I added the DSP background, added a Whisper White rectangle punch, added the outline Coloring stamp of my choice and voila. So easy.  You print them out, cut them into four (you can fit four on a page), and put them in clear plastic sleeves.

color your own bookmark_craft fair


IMG_0709

Here is another. Well, 28 more of them. I chose different background papers and changed out the Coloring Stamp and printed them up.  Cut them to fit the 2 1/2 x 7 inch bookmark sleeves.  They turned out great and sold really well. $1 is a fair price.  It accounts for the time spent using My Digital Studio, cutting the paper to size and centering the images, and the cost of the bookmark sleeve.  I ordered the sleeves online at a bags unlimited store.

Happy Crafting.

Craft Fair Friday, Part 7

It’s craft fair friday, my favorite day of the week, along with MDS Monday! And Sunday family fun day. 

Did you get a chance to check out yesterday’s announcements about the new Color Renovation and FREE SHIPPING on April 6-8?? If not, check it out now!

What’s new in the crafting world? Well, for today’s post, I am concentrating on things to help you set up your display.  Having a good looking, not too crowded, appealing display determines whether or not partons will stop by or keep on walking.  I am listing some important elements and then will discuss them in detail.

Supplies:

  • Table
  • Black tablecloth or sheet
  • Vendor Sign
  • Catalogs, Seasonal Catalogs, Mailing List sign up Sheet, Monthly Specials, product samples
  • Display for Catalogs
  • Door prize forms on a clipboard, Door Prize box or bowl
  • Price Signs

This is what works for me.  Tailor your display to your product, maybe vintage pieces or bright fabric would better suit your craft’s theme.  I generally use an 8 foot table and a smaller 6 foot table.  The 8 foot holds sales items and my sign and the 6 foot table holds the catalogs, door prize and forms, mailing list, specials and a few outstanding cards that I want to display for purposes of booking parties.

I prefer to use a queen size black sheet because it covers the table better than any size tablecloth I have ever bought.  I use safety pins to tack my Stampin’ sign to the front of my 8 foot table.  Varying heights add depth and dimension to your table, so pick display items that add variety- think baskets, photo boxes, tiered store displays.  

In this photo you see a crowded display.  I put everything out for a day before trial run, then move things off the table and only put out selected products that I think will sell best for that event.  Don’t set up your table like this- its overwhelming and VERY crowded.  Patrons will be scared to touch and look at anything because they might bump other products or knock something over. Not people friendly. Spread stuff out and put some things away until you have room for it.

IMG_0705

This photo shows the main sale table and the side table with Stampin’ information.  Also, my vendor sign is BIG and easy to spot so EVERYONE knows what I am selling.  Also, note that I am standing.  It’s important to stand up and take genuine interest in your shoppers.  Nothing looks worse than a seller hidden behind the table, seated, reading a book, not paying attention to the lovely people taking time to shop at the event.  They will be scared to talk to you for fear of disturbing you from what you are doing. Don’t let it happen- be alert, friendly, and stand up to greet them. You can have a seat when there are no shoppers around.
164487_10151541175360879_1488968593_n

Pricing: It is important to have your prices available to customers. I don’t want my customer to hunt for the price and then be shocked by it, so I display the price clearly.  I used colored Card stock, with the item name and price printed. Laminating the signs is a good idea is you plan to do frequent shows.

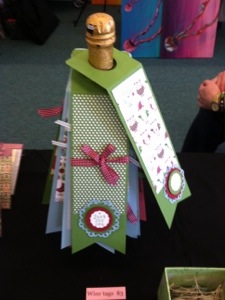
Here is an example of using height, variability and practical pieces to display the products. It shows the use- a wine bottle tag, and you can see (barely) the price sign, right in front to the bottle, with the label “Wine tags $3”.

20130330-163718.jpg

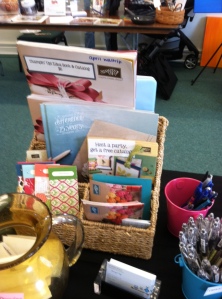
Catalog Display:  I found this magazine basket at Pier 1 Imports and it fit my needs perfectly. I put large catalogs in the back, Seasonal in front and designer paper and fabric samples in the small front pockets.  In front of that is the yellow door prize vase. I thought it added a little something to the display. Business cards are easily accessible for other vendors who want to network and place special orders.  I have a ton of pens to fill out door prize forms and jot down party booking dates on the party postcards I use.

photo4

Another thing I have found to be helpful is the less is more theory. I keep inventory under the table in plastic under the bed bins.  If a customer is looking for specific colors I can pull it from the bin and it keeps me from having an overcrowded table. As inventory sells, I straighten things up and add more product from under the table.

So here is a recap and a few other tips and tricks:

  • Use a sheet, it’s bigger.
  • Don’t overcrowd; you don’t have to put out everything!
  • Have a door prize drawing and show what the prize is.
  • Use different heights.
  • Invest in a catalog/info display piece.
  • Have business cards available.
  • Stand up! Nothing looks worse than an uninterested seller.
  • Talk to patrons, offer to help them find what they are looking for.
  • Ask them if they have heard of your product.
  • Ask them if they would be interested in ordering anything or getting together with friends for a free class.
  • HAVE FUN!

Well, that’s the list.  Those are my top tips on setting up a successful craft show display to attract patrons and engage them in your business.  I really enjoy craft shows- it gives them the opportunity to buy local, get handmade gifts, book parties which will give them a creative outlet and fun with friends, and allows me to network with other vendors.  It is a way to serve the community and make new friends.

Enough about craft fairs, I do want to show off a new card.  It has been awhile since I have posted an actual card, something that is not digital.

IMG_0716_2_2

It uses:

  • Fabulous Phrases stamp set
  • Twitterpated DSP
  • Whisper White Card stock
  • Crumb Cake CS
  • Baja Breeze Ink
  • Sponge
  • Baja Breeze 3/8′ ribbon
  • Rhinestones
  • Dimensionals
  • Big Shot
  • Apothecary Accents Framelits

I cut a base card out of Whisper White card stock.  I added a layer of Whisper White (4 x 5 1/4). I adhered the layer to the base.  I cut 1 x 1 1/2 inch rectangles of Twitterpated DSP and spaced them evenly. I ran crumb cake paper through the Big Shot with framelits.  I stamped the Fabulous Phrases sentiment in Baja Breeze and sponged the edges so it would stand out.  I colored the rhinestones with a Sharpie! It works perfect. I tied ribbon across the card base and added the cut out with dimensionals on top. I love the simplicity.  How CUTE!!

Lastly, if you missed the previous Craft Fair Friday posts, you can see them here:

Craft Fair Friday, Part 5: Fancy Flower Journals Tutorial

Craft Fair Friday, Part 4: Post-it Note Frame Holders Tutorial

Craft Fair Friday, Part 3: 3×3 Card Boxes

Craft Show Display Pictures

Craft Fair Friday, Part 2: Tiny Tags Tutorial

Craft Fair Friday, Part 1: Hand Sanitizer Purse Tutorial

Craft Fair Friday, Part 6

Sale-a-bration Reminder:  Today is the last day of SALE-A-BRATION!!  So, put in your $50 order to earn your freebies!!


Today, I am reposting the tutorial for these new glass pebble magnets. I have gotten a lot of requests regarding how to make them, so here it is:

Materials:

  • 1 inch glass pebbles (Dollar Tree- about come 30 in a bag)
  • Crystal Effects
  • 1” circle punch
  • Designer Series Paper (DSP)/Patterned paper of your choice
  • Hot glue gun
  • High energy magnet buttons [craft magnets] (50 pack from Michaels for about $7)

IMG_0599

Instructions:

Supplies

Punch 1” circles out of your favorite DSP. punch

Put a small dot of Crystal Effects on the paper and firmly press the glass pebble on top. (I was surprised at how little you need for it to spread out and cover the entire circle.)

crystal effects

adhere the pebble to paper

Allow to dry (doesn’t take more than a few minutes).

glue magnets to back

Turn over pebbles and hot glue magnets on the back of the pebble.

IMG_0355

Enjoy the finished magnets!!

IMG_0597

I really enjoyed making these magnets and I know you will too. I priced them at $1 for selling at craft fairs.

Here is the cost breakdown:

Magnets $7 for 50

Mini glue gun $2 (I had no idea they were so inexpensive now!)

Glue sticks $2

Stampin’ Up!’s Crystal effects ($6.25, but I already had this)

Patterned Paper scraps – free from my leftover cardmaking stash

Pebbles $1 for 30-ish (I bought 2 bags to use with all the magnets)

This is the amount I invested in them, but they are less expensive each time you make them because you acquire the necessary supplies.  Happy crafting and share your magnet pictures with me please!

Lastly, if you missed the previous Craft Fair Friday posts, you can see them here:

Craft Fair Friday, Part 5: Fancy Flower Journals Tutorial

Craft Fair Friday, Part 4: Post-it Note Frame Holders Tutorial

Craft Fair Friday, Part 3: 3×3 Card Boxes

Craft Show Display Pictures

Craft Fair Friday, Part 2: Tiny Tags Tutorial

Craft Fair Friday, Part 1: Hand Sanitizer Purse Tutorial